More dolly things I have made!

This is following on from my last post, Making things for Shovel.

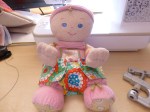
I made an extra nappy for Shovel with some more spare material. This was just as well because Izzie decided she liked the nappy so much that her bear, who is luckily the same ‘unusual’ shape as Shovel, also apparently needs to wear a nappy.
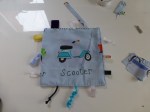
Crocheted dolls' blanketIzzie has this little fold up dolls’ pushchair and she likes to put Shovel in there and then pile lots of other stuffed toys in on top of her.

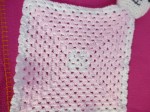
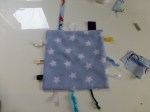
I thought I’d make a little crocheted pram blanket for Shovel. The pram is in pink (I tried and tried to persuade her to choose the blue pram, damn it) so I crocheted it in some scraps of pink wool.

Now that she has all these things for Shovel and the pram I thought I’d have a go at making a bag for the pram. I’ve not attempted a lined tote bag before so this was a first. It worked out OK so I might have a go at making some more for my next handmade fair.

Above shows the little bag on the pram – I used some pink bias binding to make some little straps to match the binding on the pram. The material is just a fat quarter of fabric and the lining is just some plain cotton. I made the bag and a nappy from the fat quarter and still have a little bit left.

Dolls' cloth nappies and bagSo, Shovel now has a nice little selection of things to go in her changing bag, which fits nicely on her pram.

Izzie loves taking things in and out of the bag. She can even take it on and off the pram.

Next is a hat and bib for Shovel. I think I have enough of that fat quarter to do the bib…

Incidentally, I can make any of these to order 🙂

Advertisement

Making things for Shovel

Anyone who has met my little girl has also met Shovel.

She takes Shovel everywhere with her. Apparently Shovel loves to go shopping. She shares her food with Shovel and luckily it appears Shovel will eat things that Izzie isn’t too keen on. Shovel will also check out new territory by being thrown in that direction.

The famous ShovelThis is a rare picture of Shovel, on her own.

Most pictures of her are with Izzie. In fact any of our holidays photos with Izzie in front of various scenes, have been photo-bombed by Shovel.

She’s everywhere!

So, Izzie is now liking to do things with Shovel that I do with her. She likes to brush her teeth, comb her hair and feed her. Recently she has decided that she likes trying to put shoes and bibs on Shovel.

This gave me an idea. Izzie loves Sing and Sign and currently one of her favourites is about Jessie cat needing the potty. Izzie wears cloth nappies so I decided to make a cloth nappy for Shovel.

Now this ended up not being quite as easy as thought it might be. I know people come in all shapes and sizes, and so it seems do dollies!

I used paper to fit around Shovel to get the basic sizing and then cut out a pattern. I used some scraps of patterned material and just used some plain cotton for the lining. I top-stitched the whole things and then added a couple of poppers. Below are some photos I took of the process – as you can see, Shovel is an ‘unusual’ shape 🙂

My little girl loved the nappy so much I made another one and a little bag to keep them in – which I’ll post another day!

Geeky sewing inspiration

I bought a fancy new sewing machine a little while ago and have made a few things using it, but not many.

geeky materialMy little girl is now in nursery a couple of afternoons a week so I have a little bit more time to sit down and try some new things. A couple of weeks ago I decided to have a search around to look for some new fabrics to give me some inspiration. They arrived last week. They’re a  wonderful mixture of sci-fi, comic book, techie, Wonder Woman and zombies. A real geeky mixture!

I’ve just finished making some coffee cosies for cafetieres. So far I’ve make a Wonder Woman, a Pacman, a zombie and a Star Wars cosy. They are all lined in a nice soft fleece to keep the coffee warm but keep the cosy nice and slim. I’ve also top-stitched them to give them a neat finish

I’ve put some tabs on the top and bottom and poppers on the tabs to make it easy to take the covers on and off. These keep the cosy nice and snug.

P1020820So what do you think? Nice and geeky?

Now I’m trying to think what to make next with all this lovely fabric. Gadget covers, baby bibs or taggy blankets? Any ideas?

These four are currently on sale in my Etsy shop.


Quick crochet – baby bunny blankies

I don’t have quite as much time to spend on new crochet projects at the moment so I’ve been trying to think of some new things to try that don’t take me too much time.

Crochet baby blanketsI quite like the ‘growth’ of blankets, either doing round and round of granny stitch or by making lots of little granny squares and then crocheting or sewing them together. I’ve also been liking doing a spot of amigurumi over the last 18 months, but it can be quite fiddly doing some of the smaller bits and needs a biggish stretch of time to concentrate and count rows.

Crochet amigurumi rabbitI’ve also been using my sewing machine quite a bit more and have been making some taggy blankies – as per my previous post on this – taggy obsessions.

I thought I might try to combine these so decided to crochet some baby comfort blankies with bunnies in one corner.

I managed to work a couple up pretty quickly, doing the blanket bit during the evening when I don’t have to concentrate too much and then the bunnies during the day when my little girl was having her short naps.

A friend recently had a baby, so I thought one might make a nice gift for her, and the other one has now gone into my Etsy shop.

What do you think? I think he has quite a cheeky little face 🙂


Crochet rag doll project

Crocheted toysOver the years, I’ve crocheted a lot of different things – some with better success than others. I’m not very good at following patterns and tend to look at a few patterns and then pretty much make it up on the fly. A bit like my cooking really…

Anyway, as a child my mum knitted me a sort of rag doll for Christmas one year. I used to love the doll. All soft and raggedy. I had the idea that I’d try to make one for my little girl.

I spent a bit of time googling patterns and looking on Ravelry and Etsy. I couldn’t really see exactly what I was looking for. I wanted something all loose limbed and without one of those prettied up faces.

I settled on a freebie pattern but not long after I’d started, it just didn’t seem to be working, so I did what I usually do and started to make it up. Yeah, I know that takes longer really, but I get something more like I originally wanted.

Well, saying that she didn’t end up being quite as I intended, but hey she doesn’t look too bad! The hair was a whole different matter, so I think I’ll write about that in a different installment, but let’s just say she has plenty of it!

I did make some little shoes to match the dress, but they already seem to have gone missing…

Taggy obsessions – a baby sewing project

My little girl is obsessed with all things taggy – tags on clothes, bits of ribbons, bits of string, cables and even stray bits of cotton on clothes. She can’t find any taggy on any toy, even in her sleep. Every new item is turned and turned around until she finds its taggy. Every day her toys get a ‘taggy inspection’.

It inspired me to try my hand at some little taggy comforters. These are the results of my efforts!

They have worked out quite nicely. I have made one side in a soft fleece and the other side in a bright cotton.

taggy blanketI’m always loosing things so I thought it would be a good idea to use my new Kam snapper and create a little strap so the taggy can be attached to a pram or bag. I actually made the little straps myself from the matching cotton rather than use a ribbon – I think it looks pretty cool (and it’s a bit more sturdy).

For the taggies I used a mixture of textures as it all about the texture for babies! Soft fleece on one side and bright cotton on the other. There are different widths of ribbons and some velvet, plus I crocheted some pieces like twists and knots. Lots of things to be twirled around in little fingers 🙂

For extra safety (and neat freakness) I top-stitched the blankies too. It also helps them lay nice and flat.

My sewing machine also does embroidery so I’m thinking I might have a go at doing some personalised ones next – when I get a spare moment or too from tidying away all the toys after my little girl has finished her daily taggy inspection!

Crochet Doll Toilet Roll Cover

I get more requests and click-throughs on this website and my Etsy site for this one thing – crochet toilet roll dolls!

I first started making them quite a while ago and blogged about how it was impossible to find a good pattern. That started me on making my own pattern for these retro dolls. I’ve been making the dolls and selling them on my Etsy site and various vintage and craft fairs for a while. They are always popular. I make them in all sorts of custom colours!

I’m constantly asked where I got the pattern and the dolls from. Well, I’ve finally got around to writing the pattern up. It’s now available for immediate PDF download on my Etsy shop. Happy crocheting!

I might eventually get around to writing up a few more of my patterns… maybe it will be the zombies next 🙂


So, I’ve just dyed a doll’s hair…

Bride crochet toilet roll dollAs you know, I make all sorts of things. Some of the most popular of my creations are the toilet roll covers and toilet roll dolls.

I have been using the same dolls from the same supplier for quite a while now. It can be quite hard to find the right size (at the right price). The dolls are all white and blonde and I’ve just not seen any others.

A couple of weeks ago I had a custom order from my Etsy shop for one of my bridal toilet roll dolls, but a brunette. Well, I searched and searched and managed to find one but the price was ridiculous!

So, I had a sudden flash of inspiration – could I dye the doll’s hair? I tentatively started to Google, thinking I wouldn’t find anything, and low and behold found quite a few links to how to do it. Mainly on how to create a goth doll, but I didn’t let that put me off 🙂

Anyway, a couple of links were suggesting acrylic paint for vinyl dolls and I used to do quite a bit of painting so dug out my acrylics. I chose a raw umber for the dye and gave it a go. The first attempt was a bit wishy-washy, but I tried it again with a bigger blob of paint and less water and it seemed to work quite well. What do you think?

The biggest tips I can think of for doing this is:

  • Pop the doll’s head on something like a pencil if you can – it makes it much easier to handle
  • Pop some vaseline on the dolls face so you don’t dye her face too
  • Use a brush or something similar to do the roots
  • Comb the paint through before it dries, otherwise it clumps and is a pain in the bum to sort out.

I’m really pleased with the results and it wasn’t even difficult to do – every day’s a school day!

First sewing projects

Well yesterday I had a play around with my new sewing machine. It’s been years and years since I had a decent machine. For my first project I chopped up an old dress and made a simple skirt.

Today I wanted to try something different. My little girl loves all things ‘taggy’ so I thought I’d have a go at a taggy blankie.

I’ve used soft fleece on one side and cotton on the other. I think all little ones like different sorts of taggies (silky, textured, knotted etc) so I tried to come up with something different to the usual bits of ribbon that you see on them. I’ve noticed at the moment my little girl likes knotted things as she’s teething, so I included a few of those too. Also, as crochet is my usual weapon of choice, I crocheted a few taggies too.

One thing I find useful with toys is to have something to attach them to the pram with. Imagine losing their favourite toy or blankie! So, I made a little strap and I just need to pop the Kam popper onto it. Actually, it will have a dual purpose as my little girl currently has an obsession with all things strap-like. I guess you could also use it to attach a dummy?

Anyway, I also top-stitched it so it has a double set of stitches to keep the taggies safe and I think it makes it look better too. Oh and I had to use a scooter fabric 🙂

What do you think?

Too busy to post? Put out the bunting!

Yeah, that’s me!

I’m not quite finding the time I used to find to do little things like posting on here. It’s not even that I don’t like doing it, but I just don’t seem to find the time recently!

My little girl seems to have such a busy diary, I have enough on just keeping my Etsy shop open and keeping up with orders, and writing my regular articles for the Nottingham Post.

P1020201The main orders that are keeping me busy at the moment are for my handmade bunting. It’s all crocheted by me, including the letters so it’s quite time-consuming. It would probably be quicker to use felt letters, but I quite like the look of the crocheted letters. They have a much more 3D effect. The first one I did was something for my little girl’s room and I had so many queries I thought I start to make them for the Etsy shop.

And yes, my little girl’s room is purple…. she can’t choose colour schemes at the moment, so I choose them for her 🙂

I’ll post up some pictures of some of the other ones I’ve made as soon as I get around to it. I’m thinking they might work quite nicely for weddings, birthday and housewarming pressies.